Apply for a transaction certificate
A transaction certificate (TC) records the sale of certified biomass to a buyer. You, the seller, apply for it. Your Certification Body (CB) checks the application and approves it. The quantity you sell is taken from your available stock.
Before you start, make sure that:
you have an active scope certificate for the module you sell under;
the buyer is linked to your account;
you have available stock to sell.
Start the application
Go to Certificates › Transaction › New application, or select New TC Application on the dashboard.
Select the module you sell under. The list shows your scope certificates with their module, GGL categories, validity period and CB. Check the module carefully before you proceed.
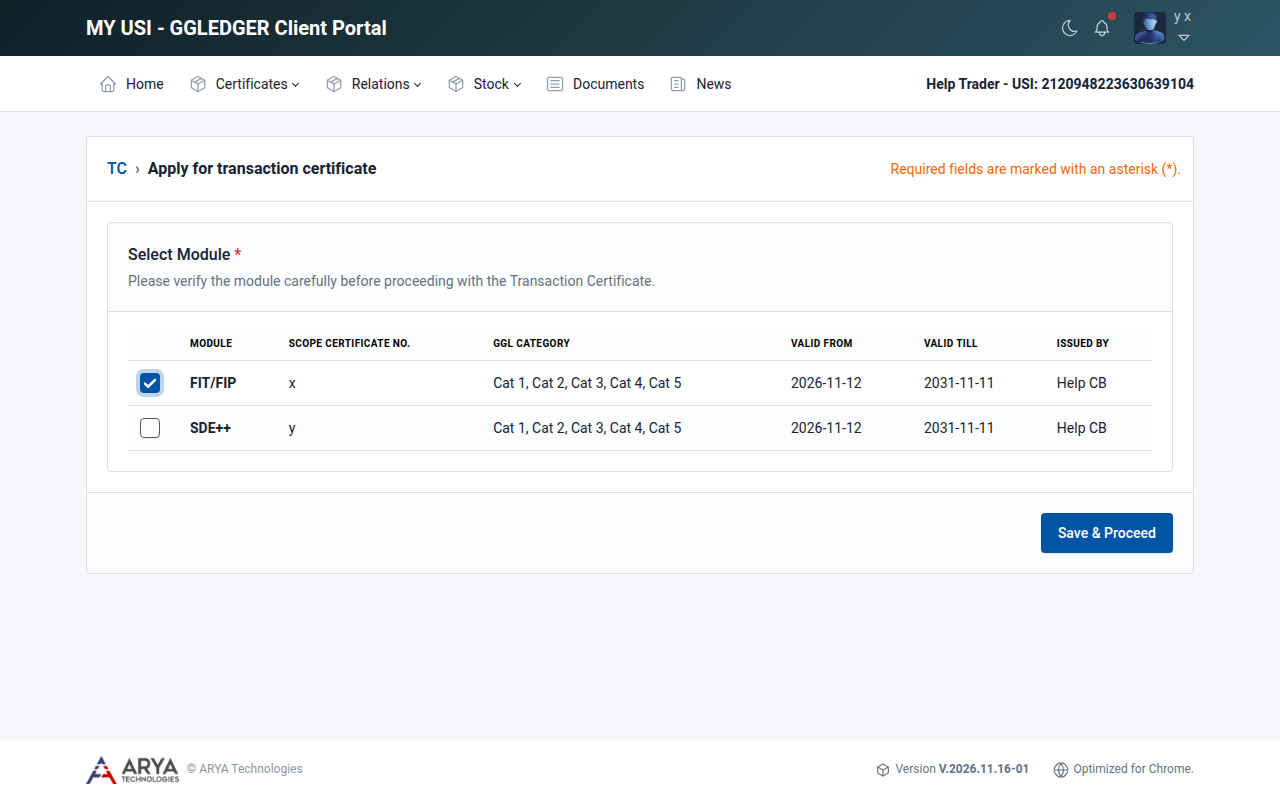
Fig. 30 Selecting the module for a transaction certificate.
Select Save & Proceed.
The application is created as a draft and guides you through seven steps. The bar at the top shows where you are. Your entries are saved each time you select Proceed, so you can stop at any moment and continue later.
Step 1: Buyer info
The seller (your company) and the Certification Body are filled in for you.
At Buyer, choose to search by Name or by USI and start typing. Select the buyer from the list that appears.
At Dispatch city, start typing the name of the city the biomass is sent from and select the city from the list. The city of your company is filled in for you.
At Destination city, do the same for the city the biomass is sent to.
Select Proceed.
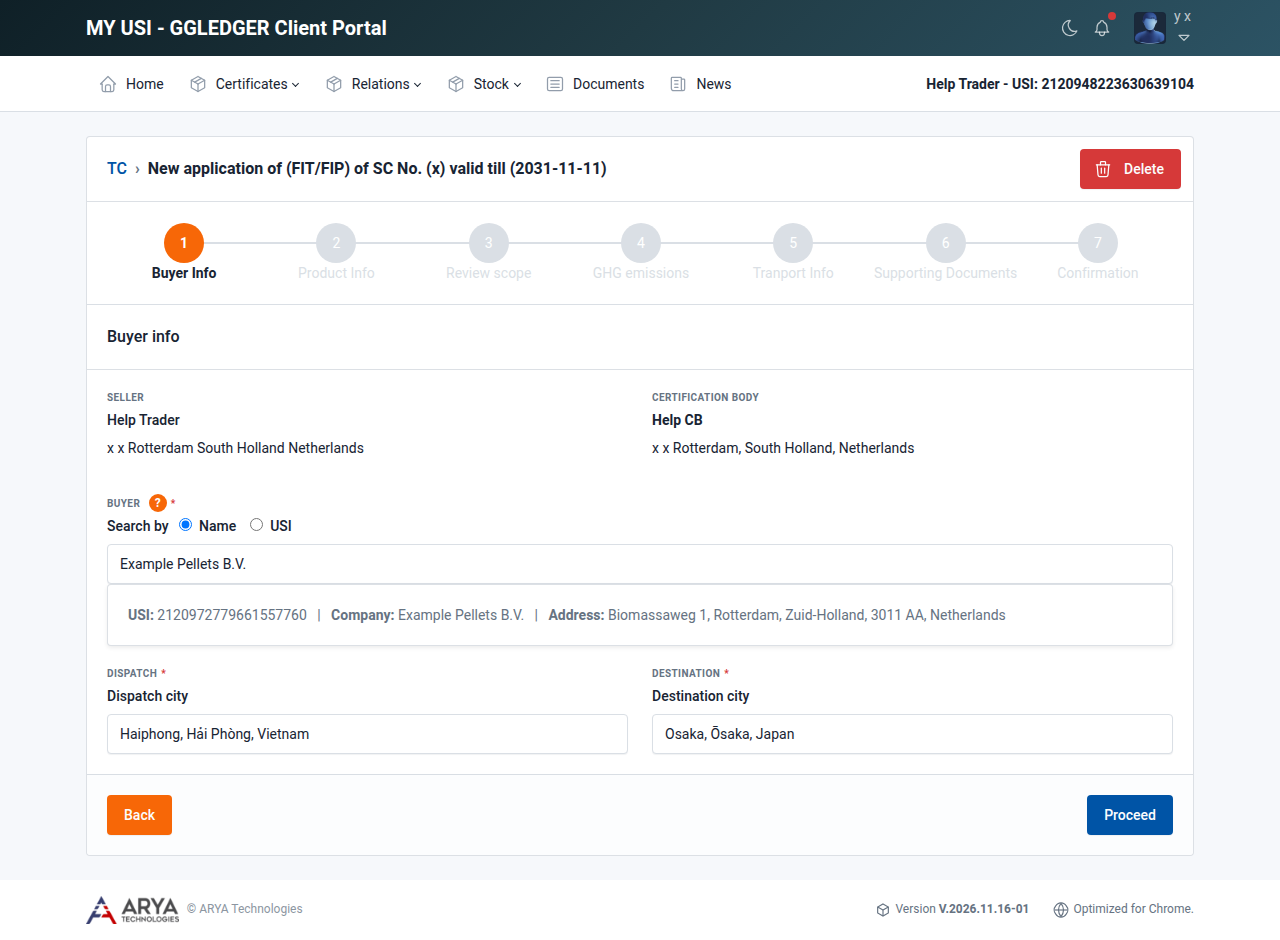
Fig. 31 Step 1, Buyer info.
Note
Type the full name of a city and choose it from the list. If the city does not appear, check the spelling.
Step 2: Product info
Enter the Shipment / file number.
Enter the Product Name. Choose from the list or type a name.
Under the SDE++ module only: choose the NTA code that describes the product.
Select Include Suppliers of Raw Material in PDF if the suppliers of raw material have to be printed on the certificate.
Under Drain from available stock below, select the stock you sell. For each selected line, enter the quantity in Consumed (MT). The table shows, for each line of available stock, where it comes from, the identifier, product, modules, GGL category of biomass, FIT/FIP classification, GGL claim, total GHG emissions and the available quantity. Only stock certified for the module of the application is listed.
Select Proceed.
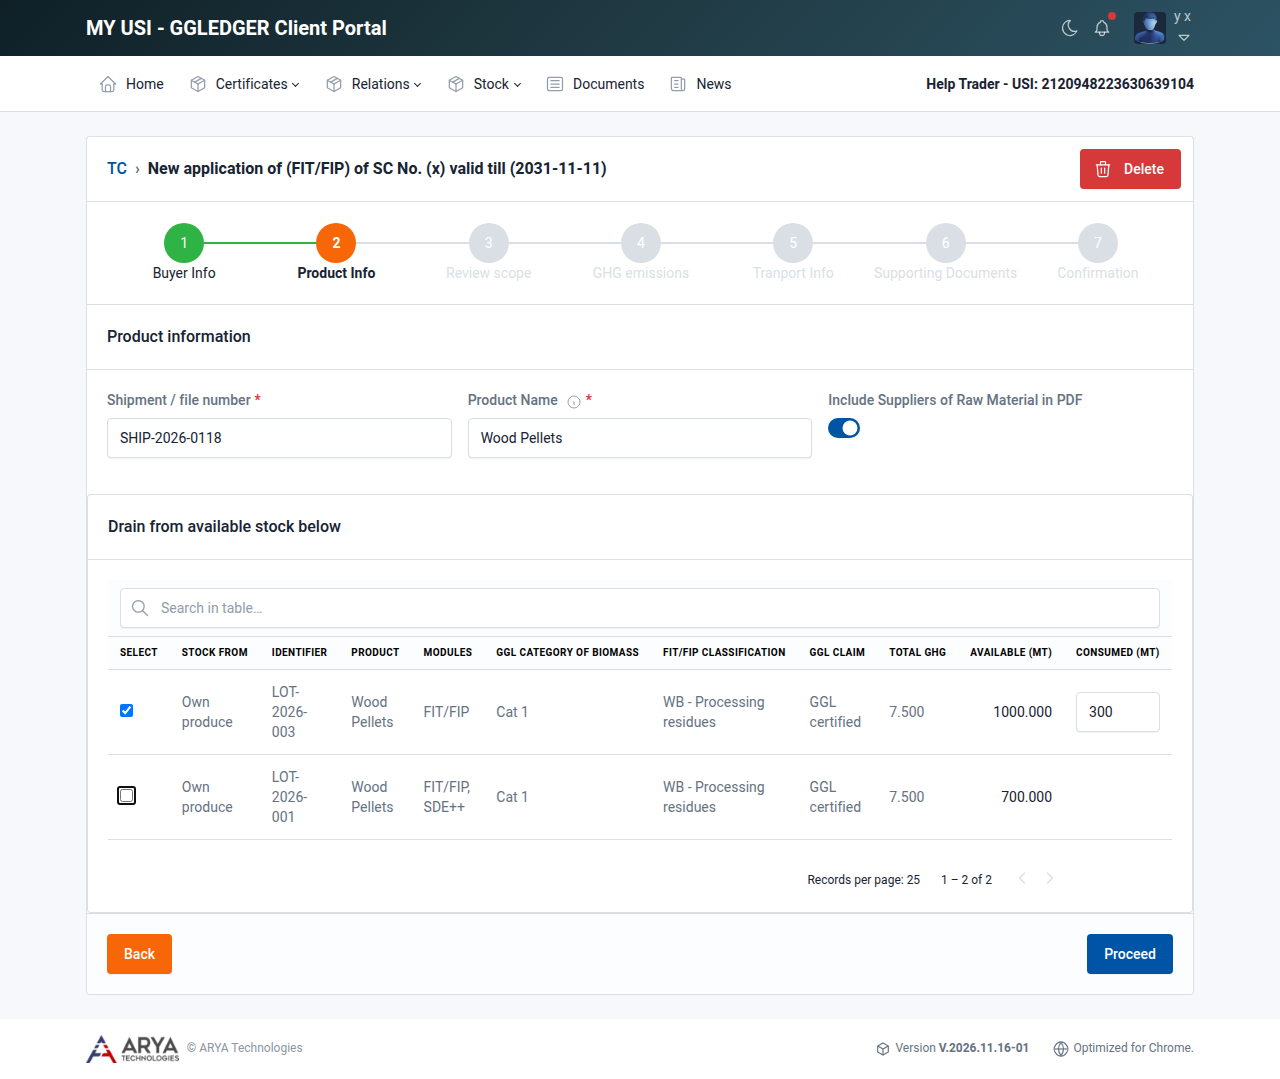
Fig. 32 Step 2, Product info.
Stock with category AR or WB
Stock registered before the current version of the platform can have the category of biomass AR (agricultural residues) or WB (woody biomass). These categories have been replaced: AR and WB are now FIT/FIP classifications, and the categories of biomass are Cat 1 to Cat 5.
A line of available stock with category AR or WB has no checkbox in the Select column. Before you can sell from it, you have to assign its FIT/FIP classification. You can also assign a new category of biomass, but that is optional.
In the FIT/FIP classification column of the line, select Select.
Choose the classification: Agricultural Residues or Woody Biomass. The classification that matches the old category is already selected. Optionally choose a sub-classification, such as Eligible fuels or Processing residues.
Select Update.
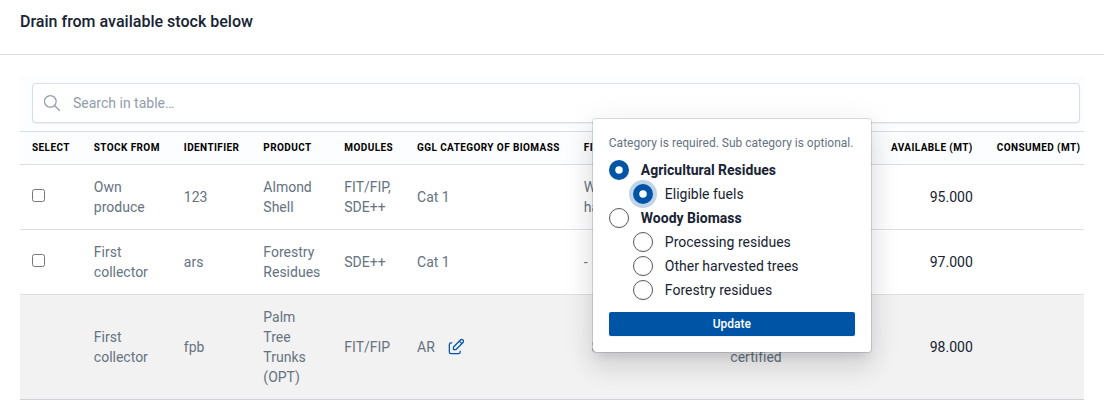
Fig. 33 Assigning the FIT/FIP classification to a line of AR stock.
The classification is shown in the line, and the line now has a checkbox.
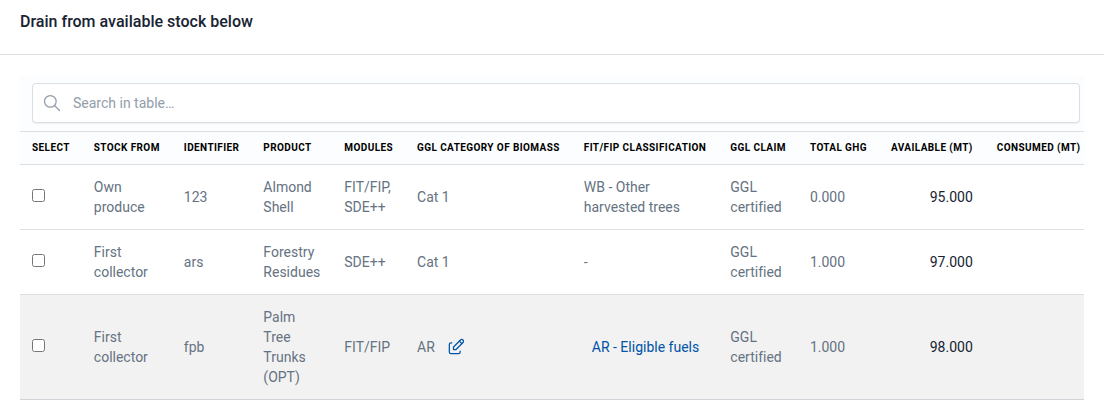
Fig. 34 The line after the classification is assigned.
Optionally, assign a category of biomass: select the pencil icon next to AR or WB in the GGL category of biomass column, select one or more of Cat 1 to Cat 5, and select Update.
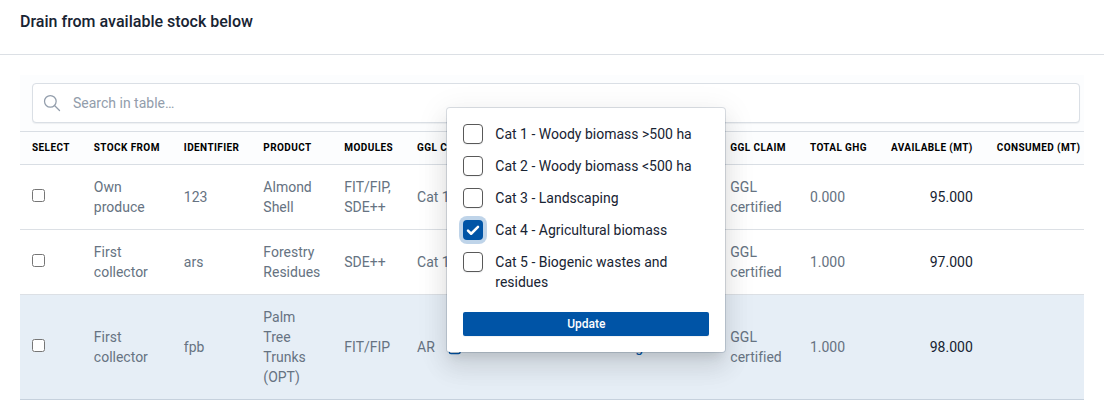
Fig. 35 Assigning Cat 4 to a line of AR stock.
The new category replaces AR or WB in the line.
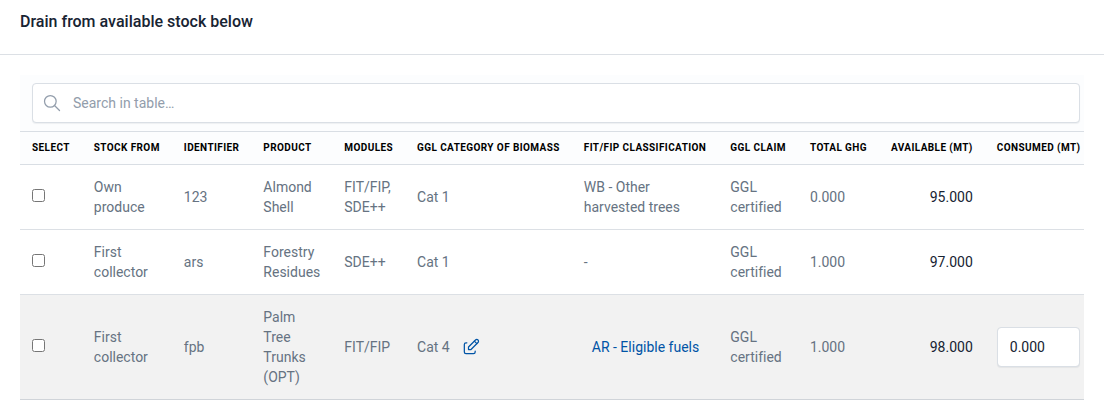
Fig. 36 The line after the category is assigned.
Select the line and enter the quantity, as for any other line.
The classification and category you assign apply to the quantity you sell in this application only. They are printed on the transaction certificate and passed on to the buyer. The rest of the line stays in your available stock with its old category, so you assign them again the next time you sell from it. You can change your choice with Select or the pencil icon as long as the application is a draft.
In step 3, the outgoing shipment shows the previous and the current category of biomass, so you can check the conversion before you submit.
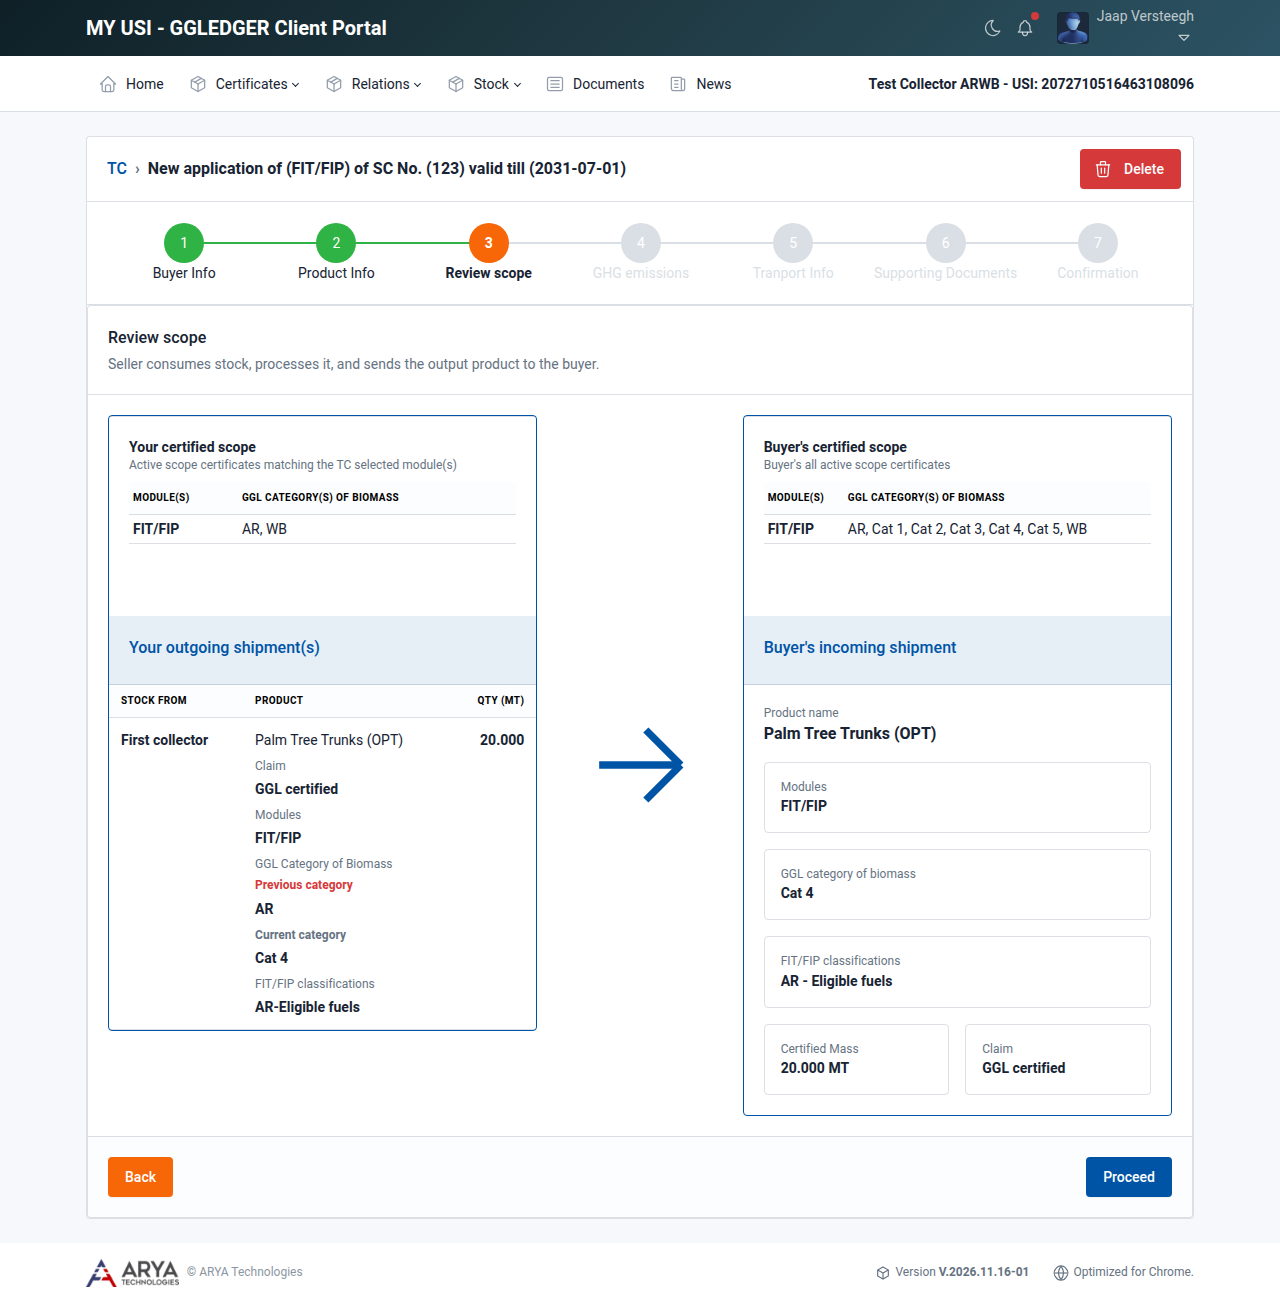
Fig. 37 Step 3, Review scope, for converted AR stock.
Step 3: Review scope
This step compares your certified scope with the buyer’s:
on the left, your active scope certificates for the module and the stock you sell;
on the right, the buyer’s active scope certificates and what the buyer will receive.
Check the comparison and select Proceed.
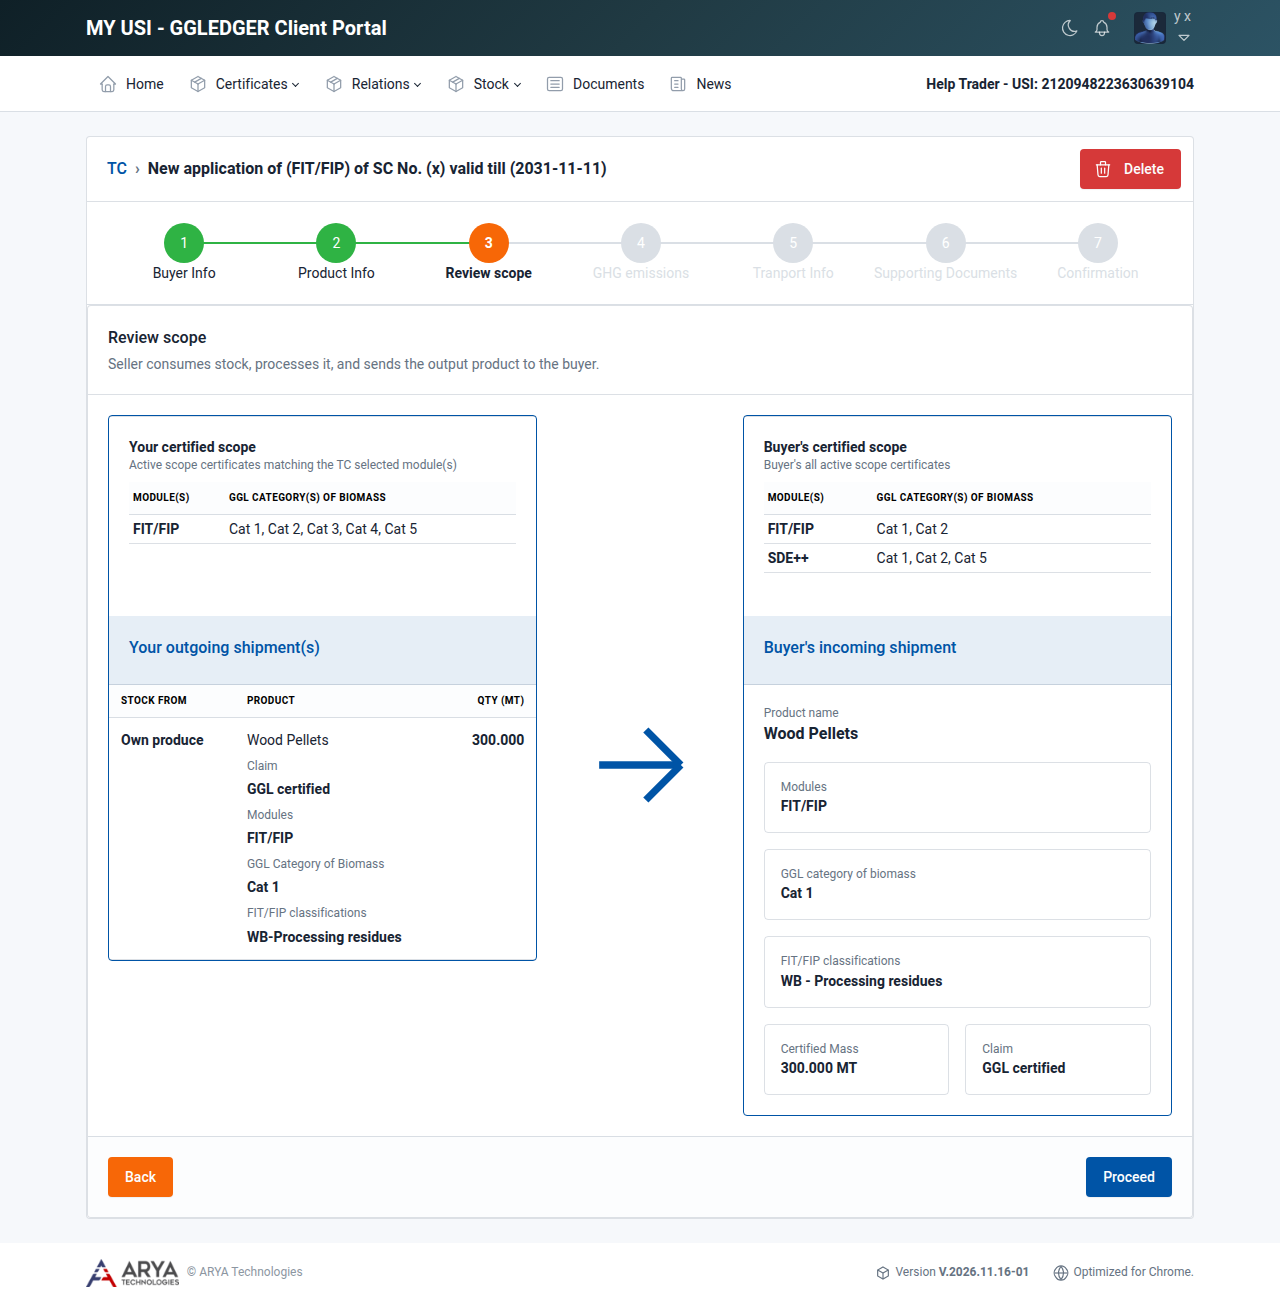
Fig. 38 Step 3, Review scope.
Important
The buyer must be certified for the module of the application. If not, the step shows Buyer certification mismatch and the message Cannot proceed, and you cannot continue. Go back to step 1 and choose another buyer, or ask the buyer to get certified for the module first.
Step 4: GHG emissions
The greenhouse gas emissions of the stock you sell are filled in. You can add emissions for processing and for transport that occurred while the biomass was with you, in the fields next to the + sign. You can also enter savings from carbon capture and storage and from carbon capture replacement. The total is calculated for you.
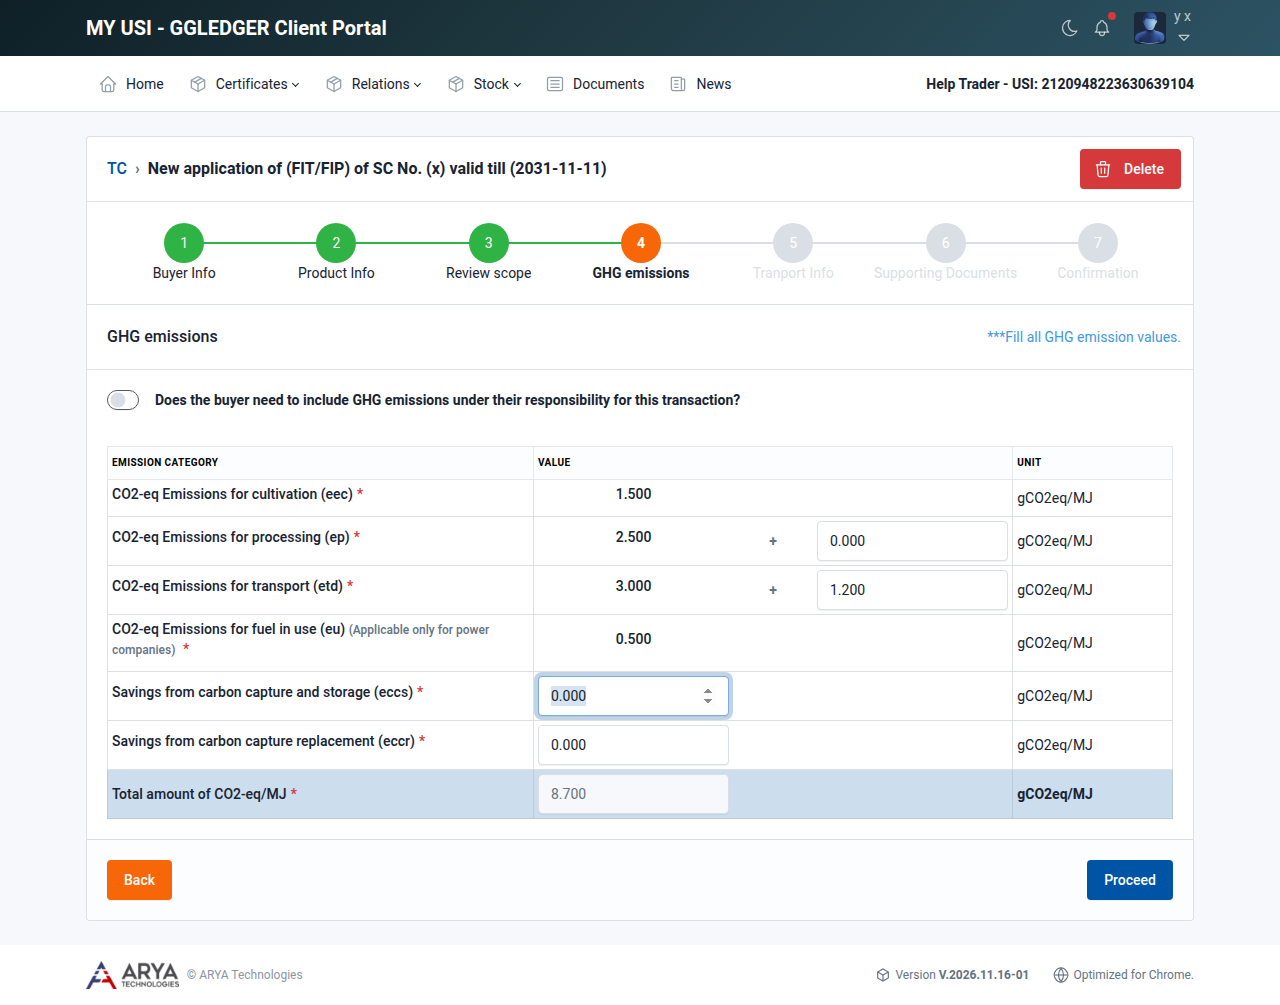
Fig. 39 Step 4, GHG emissions.
If the buyer has to add the emissions under its own responsibility, select Does the buyer need to include GHG emissions under their responsibility for this transaction? and confirm. You can then only submit the application to the Certification Body after the buyer has provided the emissions.
Select Proceed.
Step 5: Transport info
Enter the Date of loading, the Place of loading and the Place of discharge.
Under Modes of transport, choose the mode (Air, Water or Road) and enter the transport number, for example the IMO number of a vessel or the registration of a truck. Select + to add another mode, and - to remove one.
Enter any Additional info. It is printed on the certificate as an additional declaration.
Select Proceed.
If transport details do not apply, select Not applicable.
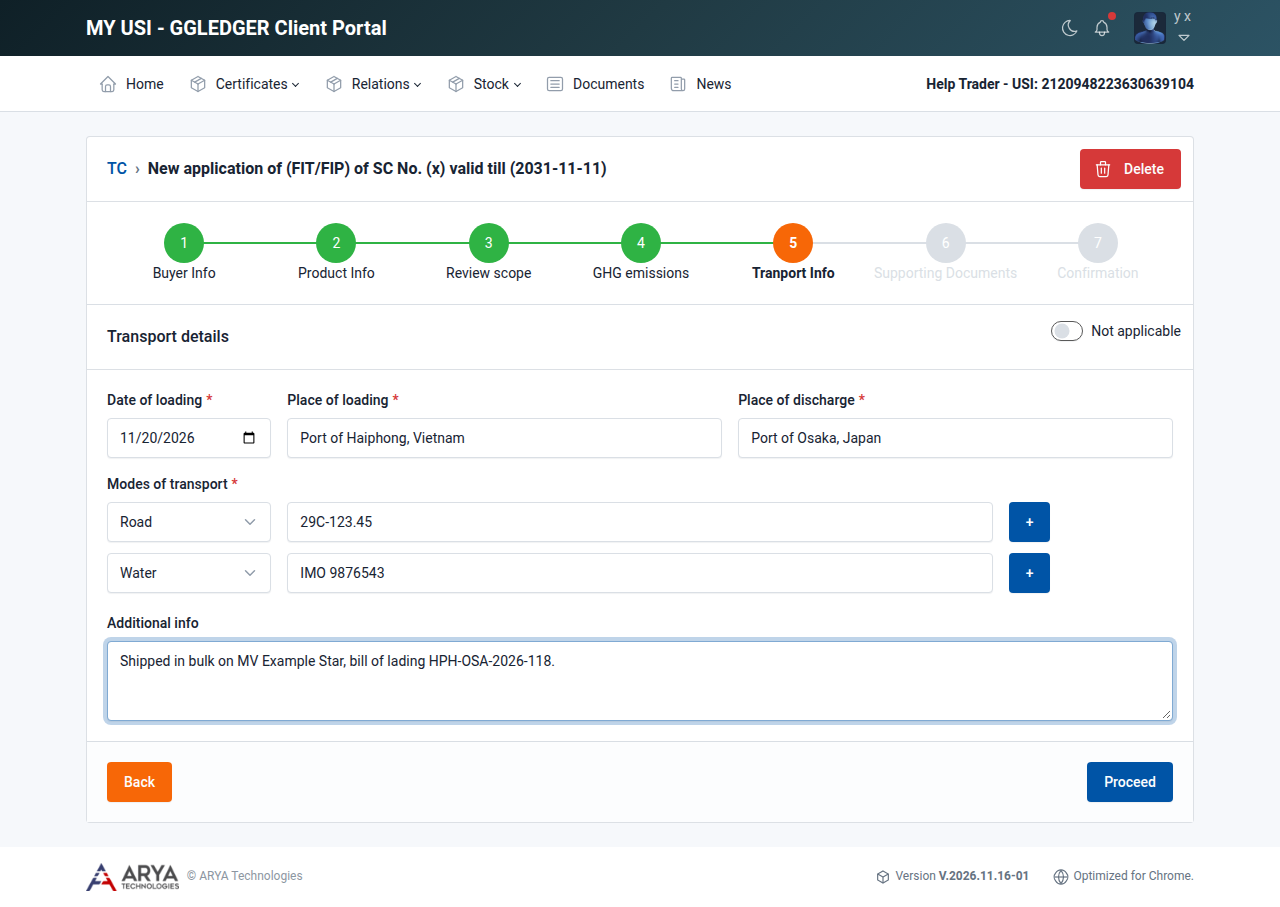
Fig. 40 Step 5, Transport info.
Step 6: Supporting documents
An invoice and a transport document are required.
Choose the Document type (Invoice document, Transport document, Supporting document for GHG emission or Other documents) and the file, and select Upload.
Repeat this for each document. Select the bin icon to remove a document.
Select Proceed.
Documents can be at most 10 MB each. The allowed formats are .pdf, .xlsx, .docx, .png, .jpeg and .jpg.
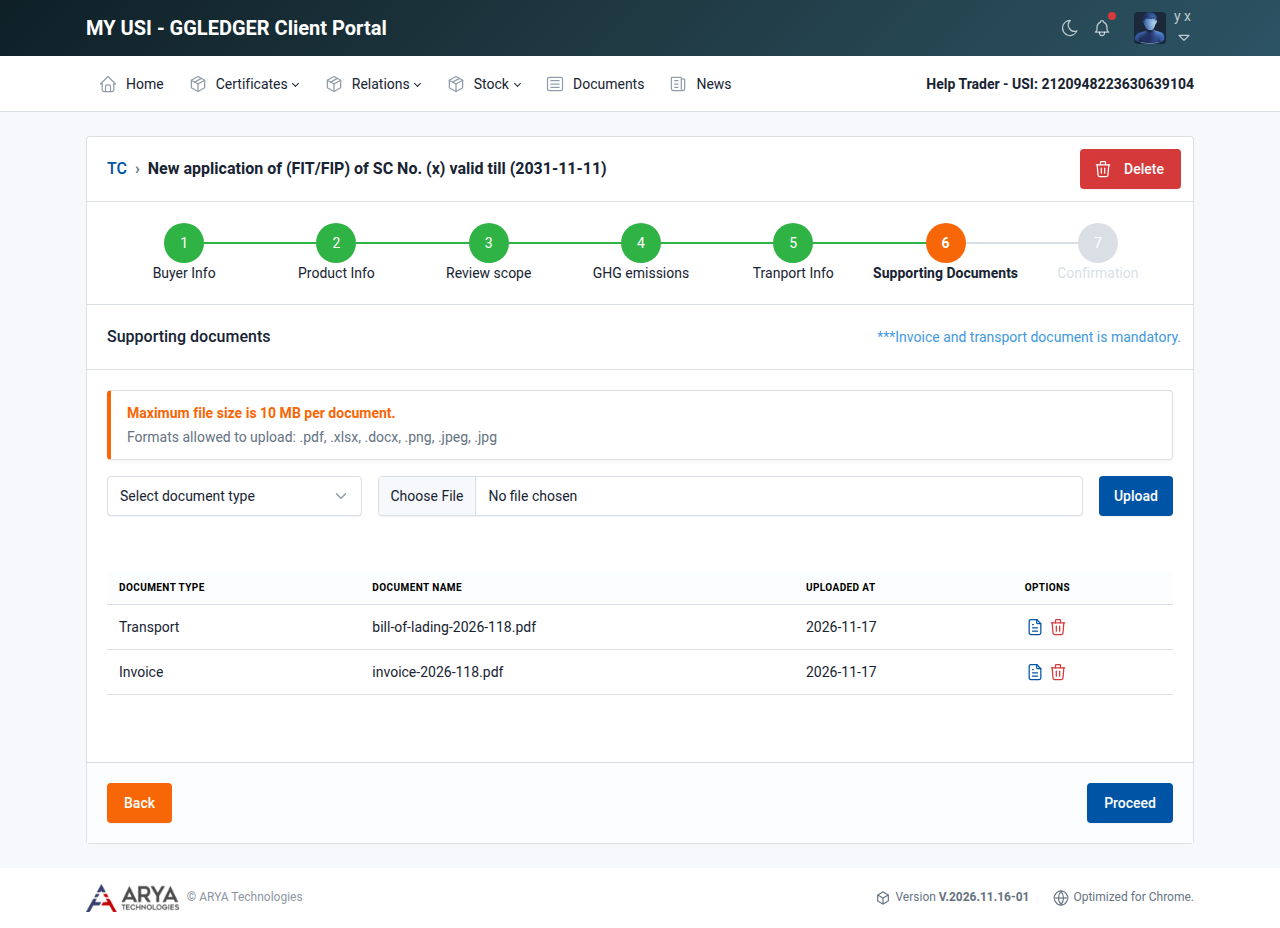
Fig. 41 Step 6, Supporting documents.
Step 7: Confirmation
Read the terms and conditions.
Select Preview to see the transaction certificate as it will be issued. From the preview you can also download it or share it.
Select Confirm and submit.
Select I accept the terms and condition and select Submit.
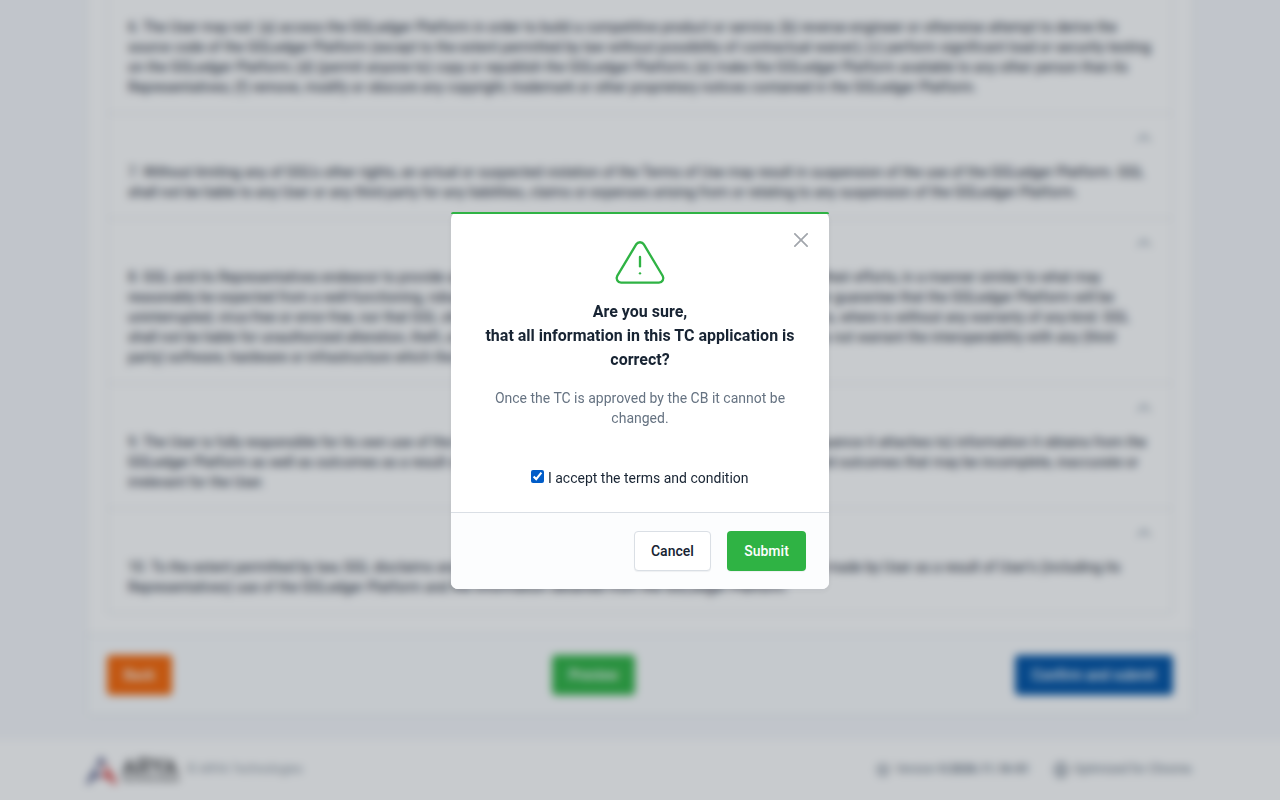
Fig. 42 Submitting the application.
The platform shows Your TC request is sent to your CB for approval, and the application has the status Applied. The quantity is reserved: it is taken from your available stock straight away.
To follow the application, see Follow your transaction certificates.
Delete the application
While the application is a draft, you can delete it: select Delete in the top right corner of the application and confirm.